GoldFynch lets you set up Batch Reviews to divide or outsource a subset of documents in a case for review. You can keep track of the number of files you and your collaborators have reviewed, or can use it to hand over a portion of the case to an external party like an outsourced managed review service. Batch reviews function similarly to navigational contexts, but in a more permanent manner.
Batch sets can be set up from the "Review-sets" view using either tags or saved searches, or directly from navigation contexts in the document viewer. In this article, we will show you how to directly set up and navigate a review set for batch review.
Note: Prior to creating a batch review set you will either need to do one of the following:
- Tag the documents that you wish to include in the batch review
- Create a saved search that will retrieve all the documents for the review
Review Sets in Under 3 Minutes
Note: A few features have been added since this video was created, refer to the rest of this article for an in-depth guide to all current features.
Creating review sets
Create a Batch Review Set (Using a Saved Search or Tag)
Step 1. Click on the Review Set button on the left pane

Step 2. Click on the Create New Review Set button on the top right corner of the screen

Step 3. Select either 'By tag', 'By Saved Search', or 'Everything' option to build the batch review set

Step 4. Select a Saved Search or tag from the list that is populated in the drop-down.

Note: In case you have selected the option 'Everything` to build the review set then the dropdown will not be visible
Step 5. Check the `Exclude items that are already in other review sets' checkbox if you would only like to include files that are not a part of any other review set

Step 6. Check the 'Include DUPE items' checkbox if you would like to include items marked through the dedupe process with the DUPE tag in your case
Note: Inclusion of duplicate items in a review set will be identified with a 'W/DUPES' text against the review set name in the review set view as shown in the image below

Step 7. Check the 'Yes, expand families' checkbox if you would like to step through child files in a file's family where present - child files/attachments will be placed immediately after the parent files in the system hierarchy.
 Note: If a tag is being used to create the review set and this option is enabled, this is applied regardless of the tag's default family tagging behavior.
Step 8a. Check the 'Yes, copy reviewed status from other review sets' checkbox if you would like to mark files that have been reviewed in other review sets as reviewed within this review set.

Note: If you have chosen to Exclude files that have already been included in other review sets in Step 5 then this step will be disabled
Step 8b. Select the review sets whose reviewed status you want to copy by clicking on the box next to the review set name. This helps in avoiding re-reviewing files that have been already reviewed in your case.

Note: The 'transfer per-user review status for files from these review sets' checkbox is selected by default. This will indicate how many files in the new review set have already been reviewed by each reviewer previously in the review sets that have been selected in Step 8b. In case you do not want to transfer the per-user review status then you will need to deselect the checkbox.
Step 9. Choose a sort order for the review set from the drop-down list.

Step 10. Choose the maximum size for the review set. If there are more files in the set of documents selected than the maximum you enter here, multiple review sets will be created and the files will be split evenly across them. See the next section for more information. Note: The maximum number of files allowed in a review set is 10000.

Step 11. Enter a name for the review set
Step 12. Click on the Create button

Once the review set is saved it will be visible on the Review Set screen.
Creating Review sets with multiple parts for large document sets
In the event that you have a really large set of documents to review the system allows you to create multiple review sets in one go. The process is similar to creating a regular review set except for Steps 10 and 11. To understand the process of creating multiple review sets we will use an example.
Example - Create a set of 3 review sets for a document set of 1200 documents.
Execute Steps 1 - 9 of the previous section
Step 10. Set the maximum size for the review set to 500 files. The system will then create 3 reviews of 400 each for our example
Step 11. Enter the name for the review set with {} appended to it. This will allow for the configuration of the part to the name.
The table below gives you various naming patterns along with how the name should be entered in Step 11
Name for Review Set | Entry in Step 11 |
| Multi Batch Review 1, Multi Batch Review 2, Multi Batch Review 3 | Multi Batch Review {} |
| Multi Batch Review 1 of 3, Multi Batch Review 2 of 3, Multi Batch Review 3 of 3 | Multi Batch Review {} of {} |
| Multi Batch Review 1/3, Multi Batch Review 2/3, Multi Batch Review 3/3 | Multi Batch Review {}/{} |
Note: In case you do not append the {} to the name entered in Step 8 then the Review set names will be created as Multi Batch Review pt 1 of 3, Multi Batch review pt 2 of 3, etc.
Creating Review Sets from Navigation Contexts
You can now create review sets directly from a navigation context. Click here to learn more about creating review sets directly from navigation contexts opened in the Document Viewer.
Accessing Review Sets
Step 1. Click on the Review Set button in the left navigation panel
Step 2. Click on the Folder icon against the review set that you would like to step through. You will be taken to your most recently reviewed document.

Alternatively, you can click on the drop-down menu in the top-left of the Document Viewer and select an existing review set from there.
Using Review Sets
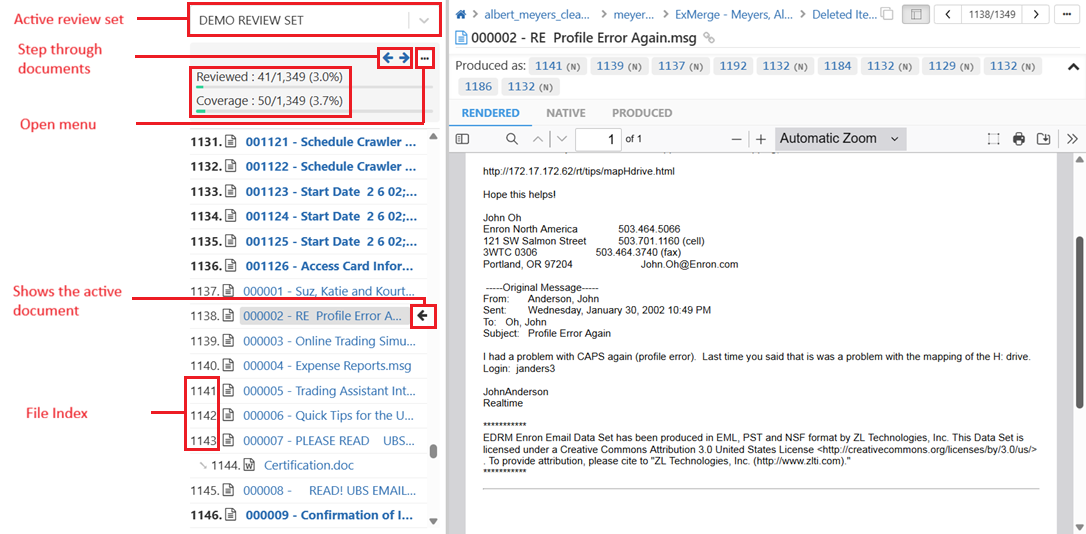
The left panel of the document viewer that usually displays the Navigation Contexts will now display the open review set, and it provides the following information
- The name of the open review set
- The list of documents in the review set with or without indexes (i.e reference numbering of the file's position in the review set). The available indexes are -
- Absolute index - This is based on the absolute value of the number of files in the review set
- Relative index - This is based on the value relative to the file that is currently being viewed
- The file names that are in bold text indicate that they are yet to be reviewed
- Navigating to a new file in the review set will count the previously-viewed file as being reviewed, and will update the "Reviewed" and "Coverage" counts and remove the bold formatting from the file's name
- The backward (<-)and forward (->) arrows help you to step through the documents that are part of the review set, as do the "Previous Document" and "Next Document" text
- The number and percentage against "Reviewed" show how many files you have reviewed in this batch
- The number and percentage against "Coverage" show how many files in this batch have been reviewed in total across all collaborators
- The Review Set Menu ("..." button) through which you can exit and navigate through the review set, as well as change the numbering system (i.e. its index, as explained above)

In the Review Set Menu ("..." button):
- First unreviewed - will jump to the first file in the review set that is unreviewed (i.e. first file with bold text in the list)
- First unreviewed for me - will take you to the first file that you have not viewed in the review set (e.g. if you review files 1-5, someone else reviews files 6-10, and you review files 11-15, this option will take you to file 6)
- Click on one of the available indexes to switch to it, or "Don't show indexes" to hide the numbers beside each file in the review set
Completing a review set
Once all the documents in a review set have been reviewed the box at the top of the review set panel will turn green.

Some important points on using review sets
- Progress in a review set will only be tracked when the set is 'active' - i.e. the review set has been opened through the 'Review-sets' view or has been selected from the drop-down list in the Document Viewer. Running a search for a review set and then navigating through the search results will not count those documents as having been reviewed
- An unreviewed file (name formatted in bold in the review set panel) is marked as reviewed (bold formatting removed) when you navigate away from the file to another file in the review set. This is done by:
- Using the previous/next arrows
- Clicking on the Previous Document / Past Document text
- If you click on a different file from the review set in the review set panel
- If you use any of the navigation options or the "Exit review set" option from the "..." menu
- If you open a file in the review set listing in a new tab it will not count as the file having been reviewed for the review set
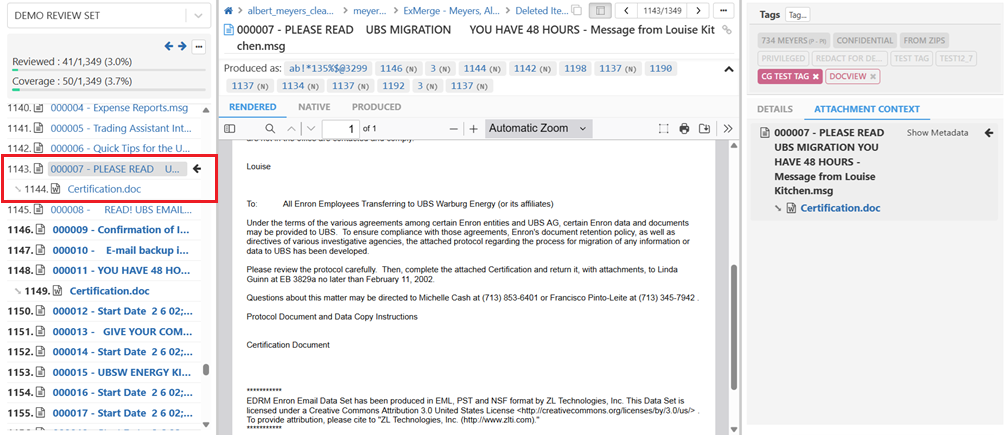
Reviewing File Families in review sets
In case you chose to include file families while creating a review set, the batch will have an indicator next to it when it is displayed in the Review-set view.

The system displays the hierarchy of files in the batch set and puts the child files immediately below their parent file - this means that you can immediately step from a parent file, like an email, into its attachments without needing to pull up additional windows or create separate review sets for those. The left half of the image below shows how the breakdown would look.
Managing Review Sets
From the review set view, you can view the list of files associated with a review set, rename, and delete it.

Viewing the files in a review set
- Click on the search icon against the review set and you will be taken to the search results page where all the files will be listed

Renaming a review set
- Click on the edit icon (the pencil) against the review set you want to rename
- Enter a new name and click on the -> button
Deleting a review set
From the review set view, review sets can be deleted individually or in bulk
To delete individual review sets -
- Click on the delete icon (the trashcan) against the review set you want to delete
- Click on the delete button in the delete confirmation screen overlay
To delete review sets in bulk -
- Check the checkboxes against the review sets you want to delete

- Click on the delete button at the top of the Review Set listing
- Click on the delete button in the delete confirmation screen overlay
Note:
- Deleting a review set is a permanent action
- User Roles with 'User' and 'Reviewer' privileges can only delete review sets that they have created
- User Roles with 'Admin' and 'Owner' privileges can delete any review set that has been created in the case