Deduplication
GoldFynch features a “deduplication” function that helps identify whether there are multiple copies of the same file present in a case, and flag such files with a special "DUPE" tag.
After running an initial "evaluation," it also displays detailed statistics related to the information that falls within your Scope (the specified sets of files to run the comparison between) and Strategy (the type of algorithm the system uses to identify duplicates.) Scroll down to the end of this article to learn more about defining the Strategy and Scope of a deduplication process.
The system then lets you run the dedupe process to add the special "DUPE" system tag to all duplicate files. It also transfers any tags and tag notes on dupe files to the "primary" file (learn more about "primaries" in the Scope section below.)
Running deduplication
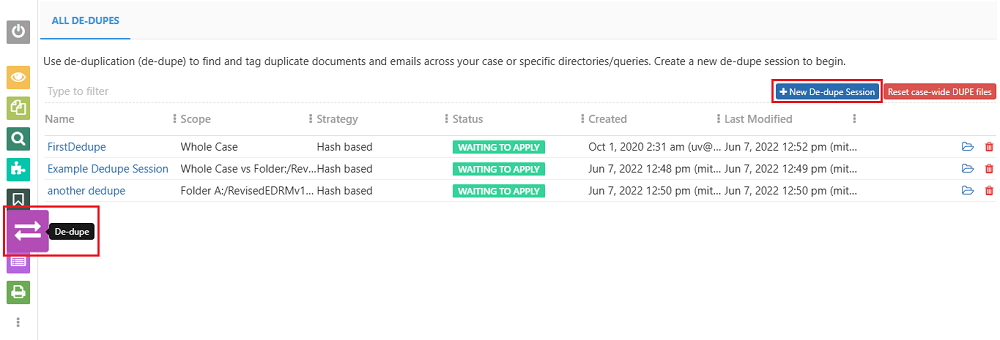
Step 1. Navigate to the "De-dupe" view and click on the "+ New De-dupe Session" button.
Step 2. Enter a name for the de-dupe session and click on the "Create" button.
Step 3. Select a de-dupe Scope and Strategy.
- If you select the Whole Case option, it is recommended you check the "Untag current case-wide DUPEs and start over" checkbox to provide an accurate evaluation based on current dupes present in the case
- If you have selected the Whole Case vs. Folder or Folder A vs. Folder B options, click on the respective "Browse..." button and select the respective folder in your GoldFynch case.
Step 4. Click on the "Save and Evaluate" button. You will then be presented with a report of the specified datasets along with information about the duplicates present in them.

Step 5. Click on the "Apply..." button to run the final de-dupe process. It will open an "Apply De-dupe" overlay.
Note:
- If no duplicates are found then you will not be able to proceed further from here.
- You can download a report of the de-dupe evaluation by clicking on the Download Report button
Step 6. Click on the "Apply" button.
Notifications
Warnings
The system scans for conflicts within the selected file set(s) that may affect the de-dupe process and will display warnings in the following scenarios:
- When files within a de-dupe session have different processing states - For example, if a file that is still processing is compared to an identical, fully-processed file it will not register as a dupe. This can affect the hash-based algorithms. The de-dupe process will ignore any groups which have files with varying processing states.
- When two or more items within a group have redactions. The de-dupe process will ignore any groups which have dupes with redactions.
- When there are items in the target item set that have tags. The system will attempt to transfer these tags and any attached tag notes to the primary item. If the primary already has tags, just the notes will be appended. If multiple dupes have the same tag with different notes, all the notes will be appended and applied to the primary item.
- If the 'Untag current case-wide DUPEs and start over.' checkbox was checked an additional warning is displayed on the confirmation overlay screen after clicking on the 'Apply...' button. If you choose to proceed, all items currently designated as DUPEs in your case will be unmarked as such and instead, only the items marked as DUPEs during the new de-dupe session will have the DUPE tag in your case
Note: the total number of items that are tagged may be more than the total number of dupes found during the evaluation. This is because the tag will also be applied to all attachments of dupe items (which are not considered or counted during the de-dupe evaluation process.)
Completion
Once the de-dupe process is complete you will see a confirmatory message at the top of your screen with the Scope and Strategy used.

If a more recent de-dupe operation has been performed, the dedupe session will indicate this instead.

De-dupe Scope
When a de-dupe operation is run, all duplicate documents are collected into groups, and within these groups one or more "primary" candidates and designates as such, with all other documents as "dupes."
The de-dupe process can be run on specific groups of files as described below:
- Whole Case - All duplicate files in the case are found
- Whole Case vs. Folder - Compares a single folder against the entire case (i.e. "do any of the files in this folder exist in the case"). The "folder" files will be marked as duplicates
- Folder A vs. Folder B - Compares one folder – also called a Target – against another folder – also called a Source (i.e. "Are there any duplicates in Folder A for each item in Folder B")
De-dupe Strategy
- Hash-based Strategies compare the item hashes directly and apply to all kinds of file types (learn more about MD5 hash values here)
- Message-ID based Strategies are used specifically for eml/msg files and look at Email IDs/Message IDs to find dupes. If an item doesn't have a Message ID, they are ignored. The Message-ID-based options listed below compare the following parameters and require them to be the same for files to be flagged as duplicates.
- Message IDs alone
- Message IDs AND Email/Message Subjects
- Message IDs AND Email/Message Subjects AND Time of the Emails/Messages
Reset case-wide Dupe files
You can easily reset all the duplicate files across your case from the Deduplication view
1. Navigate to the Dedupe view
2. Click on the Reset case-wide DUPE files button

3. Click on the Yes, reset DUPEs button on the confirmation screen overlay
 On successful completion of the reset process, a message will be displayed on the screen

Managing Dedupe sessions
You can delete completed or unwanted de-duplication sessions. Note that this just removes the dedupe session, and doesn't actually delete any files.
To do so, in the de-dupe view, click on the trashcan icon against a particular dedupe session, then click on the "Delete" button in the Confirm Deletion screen overlay.
